Drywall repair is one of the most important but complex home reno projects. For a good result, you need the right tools and skills.
First, the damaged area needs to be cleaned. Then, sanded smooth using progressively finer grits of sandpaper. A primer may then be applied to prepare the area for painting. Visit Our Website for more information.
A hole in drywall is one of the most common issues that requires a professional drywall repair. Whether it’s from a sudden impact (like an impact from a door slamming into the wall), or a gradual deterioration over time (like a hole made by a nail or screw driven through a loose piece of drywall) a hole in your drywall requires some kind of repair. Smaller holes may be able to simply be plastered over, while larger holes will require cutting out the damaged area and inserting a new piece of drywall.
A drywall patch kit can be used for smaller holes, but to create an even, smooth surface for repainting, a professional should be called in. They can cut a new piece of drywall for the area, and secure it to the wall with drywall screws and studs. They will also apply drywall tape to the seams and cover with joint compound in thin layers, sanding each layer after it dries. If you have a textured wall, they can feather the edges to blend it into the surrounding surface.
Water Mishaps
Any drywall can be affected by moisture problems, including those from leaky roofs, burst pipes, or that time your upstairs neighbor’s washing machine had a meltdown. If left unchecked, moisture can damage drywall by promoting mold growth and weakening it over time. Professionals can identify any moisture issues in your drywall and correct them before they become serious problems.
Regular Wear and Tear
Small dents in drywall occur for a variety of reasons, from kids and pets playing with the walls to moving large furniture into a room and dinging it on the drywall. While dents aren’t necessarily a major issue from a structural standpoint, they can be unsightly and require drywall repair.
Most of the time, a small dent or two in a single wall can be easily repaired by applying spackle to the damaged area and smoothing it with a putty knife. However, if your home has a lot of dents in many different rooms, or if there are unique textures like a stucco finish, it’s often best to have a professional come in and do the work to ensure the quality of the results is consistent throughout the house.
Crack Repair
A key component in the construction of many homes, drywall is an affordable and versatile material. It provides insulation, enhances the sound-absorbing qualities of a home and is fire-resistant. However, drywall is also susceptible to damage over time and may need repair. Knowing the different types of repairs and when to DIY or hire a professional can help homeowners budget for the expense.
Small holes in drywall are typically easy to fix with a bit of spackle and a putty knife. A DIY approach can save as little as $10, but you’ll probably spend between $60 and $135 if you hire a professional to do the job. Larger holes may require patches and new drywall sections, which costs more. Repairing dent and wall cracks requires more skill than patching small holes and can be difficult to match if the surface is textured.
Whether you can handle a drywall repair as a DIY project or need to call in the professionals depends on your skill level and whether you have access to the right tools. For DIYers, it’s important to understand the process of repairing drywall and be aware that this type of project can take several days. This is because a good repair takes time for the putty and compound to dry before sanding and repainting.
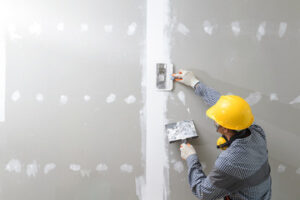
The first step is an assessment of the extent of damage and identifying what needs to be done to resolve it. This includes preparing the area by moving furniture and covering floors to protect them from dust. The next steps may include cutting out or removing damaged sections of drywall, then installing and securing new drywall. Professionals then use joint compound, often referred to as mud, on the seams and around edges for a smooth and seamless finish. They sand and apply more compound as needed, ensuring the new section of drywall blends in with the existing wall.
Another option for crack repair involves injecting polyurethane foam that expands as it comes into contact with moisture, effectively filling the crack and creating a seal. This method is relatively inexpensive and can be used for larger cracks, especially those caused by natural settling of the house.
Mesh Patches
Whether it’s a nail hole from a doorknob or a larger hole from an accident, large holes can be repaired and blended with the rest of the wall using drywall patches. These can be purchased at your local hardware store or online. While hiring a professional for new construction or major drywall repair is ideal, patching and blending are tasks that almost any homeowner can accomplish with a little guidance.
Start by cleaning the damaged area. Make sure there is no loose drywall and that any cracks or holes are smooth. Next, measure the hole and cut a drywall patch that is slightly larger than the hole for a better fit.
Place the patch over the hole, applying pressure evenly across the surface to ensure that it sticks well. If the edges of the patch are not smooth, use a utility knife to smooth them. If studs are visible (the wood behind the drywall that anchors the drywall sheets) or the edge of the patch is crooked, add a strip of drywall tape to help hide the seam and prevent future cracks.
Next, apply a thin coat of spackle or joint compound to the patch and the surrounding areas of the wall. Allow this to dry completely before sanding the area. If your patch is particularly noticeable, you can apply a second coat to help it blend in.
Once the patch and surrounding drywall are smooth, prime the area and paint it. It is best to apply a light coat of paint as over-sanding can remove too much texture and create an obvious line between the repaired area and the rest of the wall.
For textured drywall, you’ll need to create the same texture with the patch as you did on the original wall to avoid it standing out. You can use an aerosol spray texture or a hopper gun to achieve the desired look.
Knowing how to properly repair and blend drywall patches can save you time and money. When you need to patch a small hole or an entire textured wall, these simple steps can help your walls look as good as new!